How to Leverage Extent Reporting
In previous article, we spoke about bare minimum to getting started with how to use extent reporting whereas in this article I would show you how to achieve best out of extent report rather than just using it at bare minimum.
Previous Article: TestNG testing framework — Extent Report
What extra can we do to achieve an more detailed report?
With Extent Report library we can add below details to our test cases:
- User — you can assign each testcase with an user, which you could use to identify who is the author of that particular test case.
- Category — category of your test cases.
- Device — On which device did you execute that particular test case, you can pass any string value(browser/OS name).In this example I gave Win.
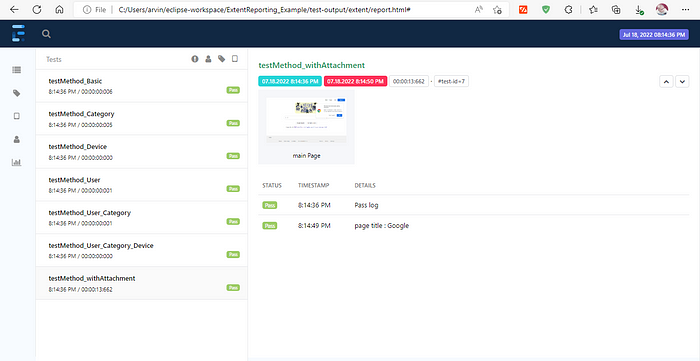
- Attachment — you can attach screenshot to test case.(refer to last snapshot).
Lets dig into how to leverage these properties of extent reporting.
I’ve added this project to GitHub, you can clone the same to go though code(link shared at the bottom of article).
pom.xml
<dependency>
    <groupId>org.testng</groupId>
    <artifactId>testng</artifactId>
    <version>7.6.0</version>
</dependency><!-- Extent Report -->
<dependency>
    <groupId>com.aventstack</groupId>
    <artifactId>extentreports</artifactId>
    <version>5.0.9</version>
</dependency>
Code:
Extent Report (snapshots):
Default view:

Category View — .assignCategory() method

Device View — .assignDevice() method

User View — .assignAuthor() method

Default Summary


Test Case with Attachmate — .addScreenCaptureFromPath() method
GitHub repository:
- Extent Reporting Example: Arvind142/ExtentReporting_Example (github.com) — Code shown in this article.
- Modular Automation Framework: Arvind142/TestNG-Modular-Automation-Framework (github.com) — Proper Implementation of extent reporting with ITestListener.
I hope these links and article help you learn more of extent reporting.